Thursday, December 29, 2011

Glass Etched Flying H Cocktail Glasses

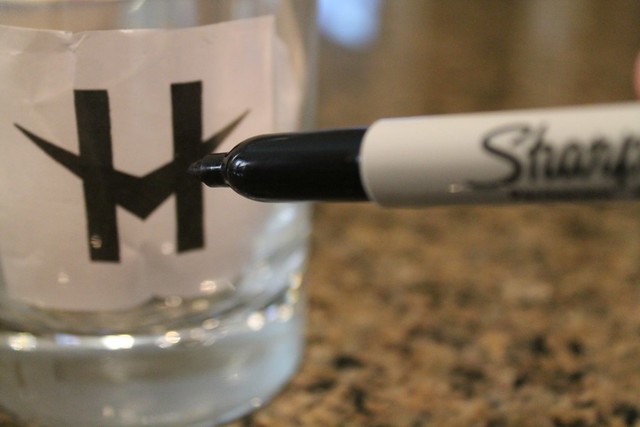
A couple of years ago my friend Lauryn did lots of glass etching for her extended family Christmas gifts. I have been dying to try it and so this year, I decided to make some cocktail glasses for my grandparents personalized with the Flying H brand. We have given personalized 'H' cocktail glasses in our immediate family for a few occasions...graduations, birthdays, Christmas, etc. but we have always purchased them from Williams-Sonoma for usually between $60 - $80 for 4 glasses, depending on the glass.

This year, I actually bought a great set of glasses from Marshalls for $6.99!! They look just like these bubble glasses from Williams-Sonoma that Ben has. I borrowed Lauryn's glass etching tool and went to work on the personalized glasses. Basically, the process is...

1) Print off the computer the image you want to etch and tape it inside your glass.IMG_9073
2) Trace and fill in the image with sharpie.
IMG_9076
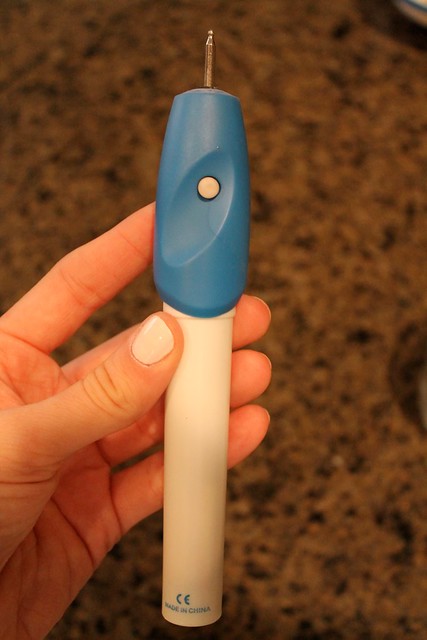
3) Etch the sharpie off the glass using your tool. This EZ engraver is the exact brand I used for $9.99.
IMG_9078
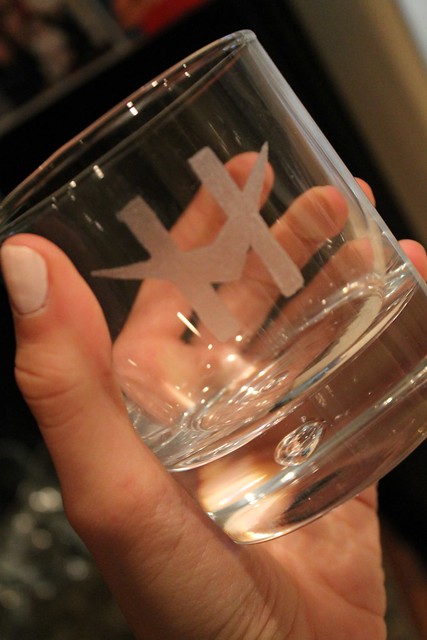
Look at how great it looks!
photo-111
photo-110
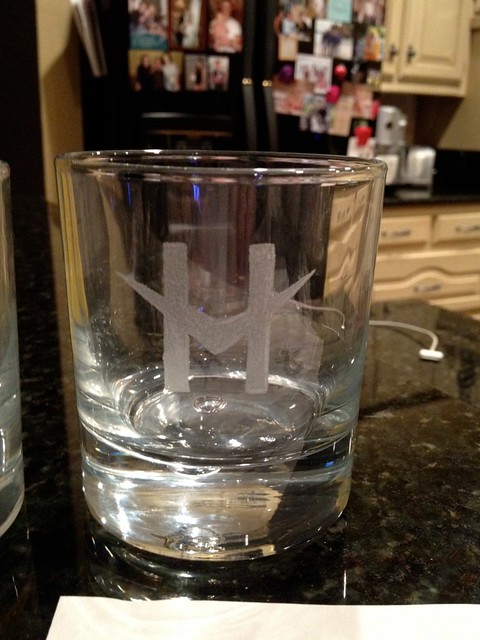
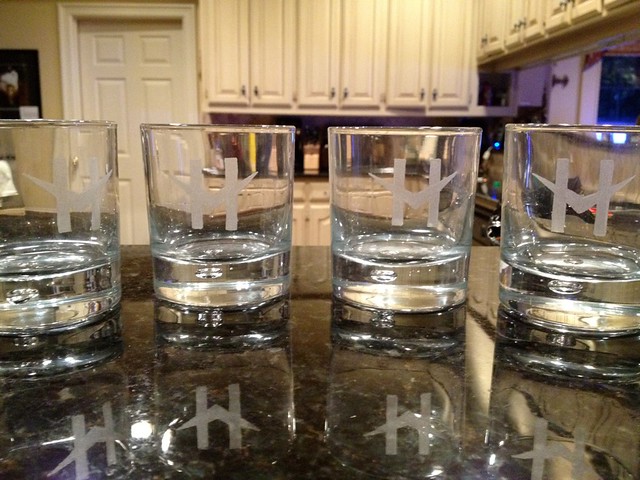
This project is not difficult at all but, it is a little time-consuming and tedious. (I.e. If your are an uber-perfectionist maybe don't do it or just expect to mess up or for it to take 10 years) otherwise, definitely go for thus super economical and very personal gift!
IMG_9080
IMG_9085

Tuesday, December 27, 2011

Toddler Hobo Sacks and Christmas Candy-breakers

For Howe Family Christmas this year, I went totally DIY. It just kind of happened that way and I really only gave gifts to the great-grandkids and to Inie and Bull.
I had this vision a few weeks ago of giving each great-grandkid their own hobo sack with their initial on it. I made one hobo sack for Ella one year and Allison tells me she still likes to carry it around so I felt good about it.
I got excited to use my yellow and white stripe IKEA fabric that I have had for months. There are 8 great-grandkids this year (and one on the way for Natalie and Jeff) compared to four when we got together 2 years ago for Flying H Trailer Park Christmas. It is so fun to just watch the family grow and grow.
I had 2 yards of the IKEA fabric and that made 7 hobo sacks...so, Ty did not get one. No big deal...I can make him one later on.
I ended up folding the fabric in half to cut out my pattern and I am so glad I did because the stripes lined up perfectly on both sides for all the bags!
IMG_8986
Even the bottoms turned out great either totally white or totally yellow.
IMG_8991
I used freezer paper to screen print a first initial on each of the bags. I decided on grey initials and straps for the five boys...black looked a little too bumble-bee and hot pink for the two girls.
IMG_8985
IMG_8984
Aubrey, Winlon, Luke, Speight, Grady, Austin (Kinley's bag not pictured..but, it looks like Aubrey's)
IMG_8983

I really love the way they turned out. I hope they can use them for years to come to carry toys, pajamas for an sleepover, books for a car ride, or anything else they might want to play with. Because I was not sure the kids would love opening a sack to get a sack, I included books and candy inside each of them for a little bit of fun.
IMG_8988
I decided to transition the heart-breaker valentines that I did for Kinley for valentines day last year into Christmas treats.
IMG_8990
I basically just drew Christmas shapes in sharpie on paper sacks and Kinley and I colored all over them.
IMG_8922
Then I cut them out, stuffed them with green and red M&M's and stapled them together.
IMG_8926
IMG_8927
I had a great helper!
IMG_8930
IMG_8932
IMG_8931

More to come on an easy DIY project I did for Inie & Bull!

Sunday, December 25, 2011

Merry Christmas

Merry Christmas from our family to yours!
SCAN0058
SCAN0057

Friday, December 23, 2011

Ornament Pillow and Magnetic Chalkboard

This year for Christmas Mendy asked for some Christmas decorations for their new house. They moved into a beautiful house this Fall and how fun to start fresh with Christmas decorations!? How cute are they in front of their new house!?
IMG_8874
I ended up making Mendy a few things and bought her a cute glitter snowman...just in case she was not into getting everything homemade for Christmas.

I fell in love with an ornament image that I saw online. I really wanted to make it into a pillow. I used the freezer paper method to screen print the image onto brown linen. If you haven't ever screen printed a multi-color image, it is pretty fun and very simple with the right image.
Screen shot 2011-11-23 at 1.44.11 PM
I started out by ironing down the image outline and two non-touching pieces from the inside and painted the exposed linen. (I forgot to take pictures of this step...epic fail....but, you will get the idea) I was really excited to find these Simply Screen paint bottles at Hobby Lobby for $2.99. They had lots of colors to choose from and I didn't have to buy the large speedball jars for like $8.
IMG_8920
After the first paint was dry, I peeled the remaining freezer paper inside the image outline.
IMG_8918
Then I ironed on the pieces of freezer paper over the first parts that I painted and painted the remaining exposed linen.
IMG_8919
After it was all dry, I peeled off all the freezer paper and heat set the entire image.
IMG_8928
I did a quick sew around the image in a square and just kept raw edges. I love the way it turned out! I love the bright colors and how it can go with traditional or non-traditional Christmas decor.
IMG_8935
IMG_8936
The second project I did for Mendy was make her a magnetic chalkboard frame. These are all over the blog-world and pinterest this year and I was dying to make one. I bought this not so cute picture at goodwill because I liked the frame.
IMG_8649
I taped off the edges
IMG_8653
sprayed it with magnetic paint
IMG_8652
IMG_8654
then sprayed with chalkboard paint
IMG_8655
then prepped it by rubbing chalk on its side and wiping it clean
IMG_8964
and voila! Finished Product! (Insert someone who has good handwriting)
IMG_8975
It looks great in Mendy's remodeled kitchen!
Picnik collage
photo-106
I also decided to throw in a subway art printout like I have in my house. This is the easiest Christmas decoration. Definitely go here if you want one for your house!
IMG_8981

Wednesday, December 21, 2011

Harrison Family Christmas 2011

Last night was Harrison family Christmas. Mendy & Alex will be in Abilene, Gary & Cheryl in Kansas, and we will be with my side of the family for Christmas day so the Harrisons got together early. Other than Kinley being sick with viral croup it was a great evening. Cheryl cooked a delicious meal and we opened lots of presents. Really, Kinley opened a ridiculous amount of presents and the rest of us opened a reasonable amount. Admittedly, Gary & Cheryl went WAY overboard this year. I am glad that it is not something she will remember too well because we definitely need to make sure we tone it down in future years. I mean...I am SO thankful that they love to shower Kinley with gifts....but, she just does not need very much. Definitely a number of gifts limit next year.
IMG_9006
Picnik collage
That sweet little concentrating face and the tongue...
IMG_9019
IMG_9020
If the quantity was not over the top already...this was the kicker...a princess art set. I blame Gary....do you see the sticker that says over 1,500 items!?!? Ben says this should go straight to the lakehouse. Ha!
IMG_9050
I sat like this during the entire present opening session...sweet asleep baby Ty-Ty.
IMG_9022
Picnik collage
I finally got a Silhouette!!!! I can't wait to start crafting with this baby!
IMG_9058
More to come on this little pillow I made Mendy!
IMG_9044
Happy Harrison Christmas!
Thank you sweet family for the Barbies and games and tea sets and art sets...and all the amazing gifts. I just keep reiterating to Kinley that the reason we exchange gifts at Christmas is to remind us that the wise men came to bring gifts to the baby Jesus. And speaking of...how cool is this image I saw on Pinterest today.
28991991320880218_xAc34eVP_c